Showing posts with label family. Show all posts

Friday, January 13, 2012

Variable Chili

The Story 

Everyone has a different idea of what constitutes a good bowl of chili, as witnessed by the large number of chili cook-offs and a huge range of ingredients in recipes for this basic dish. Chili in Texas is different than chili in Arkansas, which is different yet from chili in Ohio. So, it is with trepidation that I share with you the recipe for what constitutes a good bowl of chili in my household.

My Grandma Michalski made chili and my mother made chili, and the basics of my recipe come from them. When I started cooking for myself, I simply started from their examples and added the ingredients that I had on hand and took it from there. The one thing it's important to note is that there are endless opportunities to make alterations to this recipe, which is the reason for me naming it as I have in this posting. In fact, I'm going to start by providing you with the ingredients of the most recent pot of chili I made, which are likely different than the ingredients from the pot I made before that. And so on.

What You'll Need (more or less)
  • 4 16-oz cans of tomatoes, 2 diced and 2 stewed
  • 3 16-oz cans of beans (kidney, black, chili, pinto...I usually use a combination)
  • one 64-oz can or bottle of tomato juice (V-8 works in a pinch)
  • mushrooms, canned or fresh and sliced
  • one whole onion, chopped
  • 2 carrots, thinly sliced
  • 1 red bell pepper, chopped
  • jalapenos, diced
  • 5 bay leaves
  • cumin
  • chili powder
  • habanero sauce, to taste
Variations
As I mentioned earlier, there's not really an"official" list of ingredients for this recipe. The most common variations in my household include the following:
  • I throw in whatever vegetables I have on hand--chopped squash, any type of pepper, even kale or spinach--especially those nearing the end of their usable life.
  • At times I'll add a bit of honey or Mexican spiced chocolate, to balance a batch that is particularly hot
  • It's a no-brainer to add ground beef, chicken, or any other protein here if I'm looking for a heartier meal. 
  • Because it cooks a long time, sometimes I throw in dry beans rather than canned--or even stew my own tomatoes when they are available (not so often in Humboldt County).
  • Spices are always an easy way to play around with a dish, so I try new spices, hot sauces, chopped garlic, and the like, depending on what I have on hand.
After you make your first pot, you'll likely develop some variations that suit you and your family and/or take advantage of locally available products.  

Preparation
One reason this dish is ubiquitous in our household is how easy it is to make. Every couple weeks I get out the crock pot and throw in all the ingredients. (Before I had a crock pot, I used the same process on the stove top; it required a bit more attention, but I found that even slightly burning the chili on the bottom wasn't problematic--but just added a smoky flavor.) I cook it covered on high until it bubbles and stews for a couple hours, and then I reduce the heat to low and crack the lid to let steam out and cook it for the remainder of the day. At the end of the first day I let it cool and store it in the refrigerator for the night. The next morning I return the crock to its heater and let it cook again on low throughout the day--with the lid cracked to allow the liquid to boil off a bit. While it takes longer to do this two-day cooking process, it isn't time consuming to let the pot run on its own, and it's really the secret to decent chili: the more times you heat and cool it, the better it seems to get.

Serving
I often serve the chili with chopped raw onions and/or shredded cheese scattered on the top, along with crackers or tortilla chips. Most often, Eddie and I will have this for one main meal and then I divide it into individual-serving containers for lunches or dinners later in the week--or even into the next. It's easy to reheat in the microwave or on the stove top, and I love knowing that I have some chili waiting for me after a long day or when the rain and wind are howling and I don't want to cook.


Wednesday, December 21, 2011

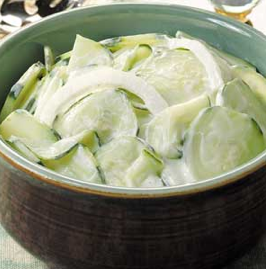
The McIntyre Girls' Michalski-Family Creamed Cucumbers


The Story

I don't remember many vegetables gracing the table at Michalski family holidays. Gatherings with my mom's family included loud uncles and some great food--fresh polish sausage, fruit salad (with a creamy covering), stuffing, fresh bread, ham or turkey, grandma's amazing banana cream pie--but vegetables were never a priority. Sure, the ubiquitous-Midwest green bean casserole would rear its head every now and then, but the vast majority of our holiday dishes were protein, carbs, and sugar. The one exception was a cucumber dish, and even those cukes were floating in some serious mayonnaise.

A number of years back when we started adding some dishes popular in Eddie's family to our holiday meals, Sarah and I decided to resurrect a few of our own. This was partly made possible when Sarah located a Polish butcher in Tigard (a SW suburb of Portland) that makes fresh polish sausage; it was like finding a bit of childhood in our backyard, and we try to visit Victor's European Meat Market at least one holiday per year. When considering a second family dish, the cucumbers came to mind (maybe because we're not ready to attempt banana cream pie), and we decided to try them out.  After getting the basic recipe from mom, Sarah and I made some changes to the dish: substituting traditional ingredients for favored equivalents (English cucumbers for standard, white onions for yellow), reducing the amount of mayonnaise, and refining the preparation to make the dish less liquidy. The result is a new twist on a traditional family dish, appropriate for all seasons but served only at the holidays in our home. 
What you'll need
  • 2-3 English cucumbers (usually individually wrapped in the supermarket), thinly sliced
  • 1 white onion, thinly sliced
  • mayonnaise (homemade or olive-oil based for the best flavor); my friend Teri recently suggested trying the recipe with sour cream instead, which I night do in the future
  • white vinegar (we often use apple vinegar when we have it)
  • salt
  • pepper (white preferred)
  • sugar (small amount)
Preparation
Note: While the soaking process takes some time, this dish is very easy to make and can be done between other cooking tasks.
  • Remove half the peel of the cucumbers (more for appearance than necessity) by using a peeler to take off long strips
  • Slice the cucumber into discs, as thin as possible
  • Immerse sliced cucumbers in a bowl of (very) salty water and let set until cucumbers are visibly reduced due to water loss (usually 1-2 hours or so)
  • In another bowl, combine mayonnaise, vinegar, pepper, and sugar. There are no set measurements here, and you should balance the taste based on your own preferences to create approximately 1-1/2 cups of liquid. (Sarah is the master of this stage.) Don't add salt yet, though, as the cucumbers will be salty after soaking!
  • Add the onions to the liquid and let stand
  • When the cucumbers are less firm and thinner, pour out the water. For best results, squeeze the cucumbers to get more of the remaining liquid out. Sarah and I generally do at least two rounds of squeezing--literally balling up clumps of cucumbers in our hands and squeezing into fists--and sometimes three. This is important so the cucumbers can absorb the liquid you created. (Our Grandma Michalski never had patience for this, so the results were always soupy.)
  • Mix the cucumbers into the onion/liquid mix and set aside for an hour or so before serving, stirring regularly; at this stage, you can make adjustments in the balance of sweet and salty, based on your preferences. You can refrigerate them if desired, but I'd recommend pulling them out 1/2 hour or so before the meal for best flavor.
Presentation/Serving
I always like to serve the cucumbers in a floral lidded serving dish that belonged to Grandma Michalski, by way of her mother, my Great-grandmother Wrobleski. Once the recipe becomes a favorite in your household, I'm sure you'll find it deserving of a similar dish of honor.

Tuesday, December 20, 2011

The Fornari Family Lasagna

The Story

Eddie's family is Italian and has a long-standing tradition of lasagna on Christmas. Over the past 15 years or so we've tried to maintain this tradition when time and circumstance allow--even to go so far as to make our own pasta. It's a time-consuming endeavor, but it gives us a group activity for the time between opening presents on Christmas morning and having the meal in the evening. Because the pasta making is the most time consuming task (and one best undertaken with 3-4 devoted cooks at a minimum), this year my sister and I have agreed on a compromise operation: we're going to purchase fresh pasta at the market, make the traditional family sauces, and assemble and bake the lasagna.

One of my favorite things about this recipe is the hand-written version I have of it. When they were in the U.S. one year for the holidays, we asked Gioia and Nonna--Eddie's mother and grandmother--to write down the recipe for us.  Here's the scanned version:

[Waiting for Eddie to help me scan the document.]

As you can see, translating the recipe from this original (narrated in Italian by Nonna to Gioia) is part of the fun and challenge involved. In part, we need to consider the equivalent of European measurements (What is 1/2 a bottle of milk, for instance?), and then there's the added ambiguity of punctuation and wording from Gioia, a non-native English speaker (realizing that "4 tbs of flour salt and pepper" don't mean 4 tablespoons of each of those things, for example).

For simplicity's sake, I'll provide the recipes for the two sauces used and general pasta preparing directions that can be used for store-bought, fresh, or homemade pasta.


Sauce 1: Meat sauce (We usually double this recipe for the holiday meal, to make a full-sized, thick lasagna)

What you'll need
1 large onion, chopped
3 garlic cloves, minced
Fresh parsley, diced
1 carrot 1/12 lb. ground hamburger
1 cup olive oil (we often use 3/4 of a cup)
1 can tomatoes, crushed

Preparation
Heat oil in a large pot
Add all ingredients and brown at high temperature
Add salt and pepper
Keep alert (This is my favorite instruction from the original, so I had to include it!)
When meat is browned, add tomatoes and two cans of water
Reduce heat to medium
Cook covered until sauce is reduced and has very little liquid


Pasta 

What you'll need
Lasagna noodles
  • The worst option (but still tasty because of the sauces) is to buy two boxes of lasagna noodles from the grocery store. It's generally really thick compared to the pasta we roll ourselves, though, so we prefer not to make the lasagna if this is our only option.
  • A good option is to find a store or restaurant that makes fresh lasagna noodles. You'll need to cook and cool them, but it cuts out a lot of time otherwise spent mixing, rolling, and drying. For this year's lasagna we bought 6 whole sheets of pasta from Pastaworks in Portland, rolled it out a bit thinner, and cut it into thick strips; it was quite good and we're likely to repeat this process next year unless we're feeling ambitious.
  • The best option, of course, is to make and roll out your own lasagna noodles; we've managed to roll them thin enough to get 10-12 layers in a single pan. It sounds like a lot, but when the pasta is fresh and thin, it melts in your mouth. In general, we take a standard pasta recipe from a reliable book and double or triple it. You can always lay out any uncooked noodles on wax paper, roll it, wrap it in foil, and keep it in the refrigerator for up to week of in the freezer for up to a month.

Preparation
Boil water in a large, deep pan
Undercook the pasta: if using fresh pasta, simply drop it in for a minute or so and pull it right back out with tongs (We just do 2-3 pieces at a time so they don't stick together.)
Dip the partially-cooked pasta in a bowl of ice-cold water to stop the cooking process
Spread pasta on towels and allow to dry (enough to eliminate excess liquid, but still remain pliable)


Sauce 2: Bechamel Sauce (This is "the glue" of the pasta, and we generally double or triple the recipe as well. Wait until the pasta is drying and you're close to lasagna assembly before making this.)

What you'll need
1/2 stick of butter
4 tbsp flour
salt and pepper
pint of whole milk

Preparation
Drop butter, flour, salt and pepper in a hot skillet or frying pan
Wuickly brown all together, being careful not to burn
When it is almost a paste, add milk
Stir for a long time, until creamy


Assembly

What you'll need
Meat sauce (above)
Bechamel sauce (above)
Cooked lasagna (above)
Parmesan cheese, grated

Preparation
  • In large rectangular baking pan, spread a thin layer of meat sauce to coat bottom and avoid sticking
  • Spread a layer of noodles on the bottom of pan, cutting pieces to fill any small areas
  • Spread a layer of meat sauce to coat pasta
  • Add a layer of bechamel sauce (drizzle it over existing sauce and smooth out slightly to distribute
  • Sprinkle a layer of parmesan cheese over entire area
  • Continue to layer pasta, meat sauce, bechamel sauce, and parmesan until pan is full or you run out of one or more ingredients
  • Insert a small amount of remaining meat sauce between edges of pan and pasta to avoid sticking

Cooking and Serving
  • You can prepare the lasagna a day in advance if desired, keeping it covered in foil in your refrigerator until a few hours before cooking and serving. 
  • Bake at a high-temperature (425-450 degrees) loosely covered in foil until sauce is bubbling at edges--40-60 minutes, depending on size and number of layers
  • Remove foil after 30 minutes or so to allow excess water to burn off and top/sides to brown. Loosely cover again to prevent burning if more time is needed after this occurs.
  • Test center for done-ness by inserting a clean knife and pulling back to see if sauce if cooked and runny
This meal is a labor of love, but it is well worth it. One side effect, though, is that it will forever ruin you for restaurant lasagna. It simply cannot compare.